Skip to content
Home > Services A to Z > Orthopaedic AHP Therapy > Page 2

Orthopaedic AHP Therapy

What is a Tibial Fracture?
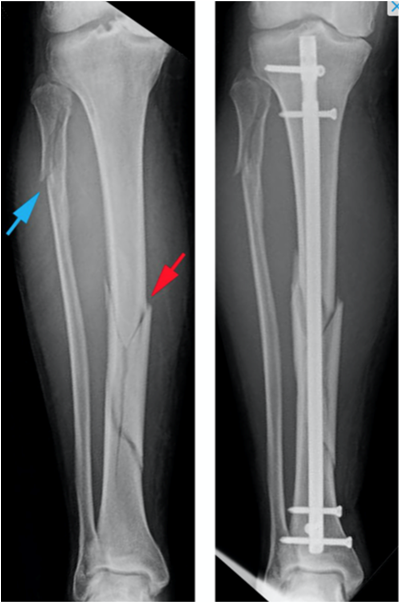
A fracture is a break or crack in a bone. The Tibia is the ”shin bone” in the lower leg, between the knee and ankle. The top of the tibia is the bottom half of the knee. The bottom of the tibia is the top half of the ankle. The fibula is a smaller bone that sits on the outside of the tibia. A tibial fracture is a break or crack in the tibia. It happens when a force is applied to the bone that is stronger than the bone can withstand.

This sometimes happens after a fall, playing sport, a road traffic accident or a fall from height. Occasionally the skin will be damaged at the same place as the fracture which is then called an ”open fracture”. Sometimes the fracture goes into the knee or ankle joint, which is then called an “intra-articular fracture”.

Why is my injury being treated with surgery?

The aim of surgery is to realign and stabilise the bone while it is healing. This is to try and prevent permanent stiffness, weakness and pain. Some tibial fractures can be treated in a plaster or splint if the bone is not displaced and stable, you accept the displacement or surgery would be too risky for you.

What does surgery involve?

Surgery usually involves the bone being realigned either through pulling the leg straight or with a clamp through small cuts in the skin. The bone is then held together with a metal rod that is put within the bone. This rod goes from just below the knee to just above the ankle. Screws lock the rod in place at the top and bottom. There are other ways that tibial fractures can be fixed surgically but your surgeon will discuss them with you if that is necessary. Usually the other methods are if you have an open or intra-articular fracture.

You will usually have a small cut (wound) at the front of the knee, two small stab wounds just below this and another 2 small stab wounds just above the ankle. If another wound is needed to realign the fracture with a clamp you may have another wound at the level of your fracture.

There are always risks of surgery, these will be explained to you before surgery takes place by your surgeon. Surgery will either involve a general anaesthetic (going to sleep) or a spinal anaesthetic (numbing your leg so you don’t feel the surgery). This will be decided between you and your anaesthetist. The surgery usually takes between 1-2 hours.

What Happens Next?

You will usually be discharged from hospital within a day or two after surgery unless you have problems with your mobility. Before you go home a doctor or nurse will discuss with you whether you need to take any blood thinning medication. You will usually have follow up at 2 weeks and 12 weeks after surgery. These appointments will should be given to you before you leave hospital.

Walking Boot : You will usually go home wearing a walking boot that you can put as much weight through as you are able. You should wear this for 2 weeks after surgery (you can wear this for up to 6 weeks if you find it helpful). You can take it off when you are sitting down, in bed, or doing your exercises.

Physiotherapy : You will also see a physiotherapist before you go home that will show you how to do some knee and ankle exercises. These are also shown in this information sheet. If they think you might need some extra help they will arrange an appointment for you to see them once you have gone home.

Follow Up Appointments

At around 2 weeks after your surgery, you will be seen by one of the fracture clinic nurses. They will examine your wounds and leg. They will look at your wound, remove the clips. They will then make sure you have another appointment booked for week 12 with the fracture clinic. If they are concerned they may ask you to come back later that day or the next day to see a surgeon.

At around 12 weeks after your surgery, you will come back to hospital for an X-ray and to see a surgeon. Most people will be discharged after this appointment to patient initiated return but some may need more appointments or a physiotherapy referral.

If your bone has not healed back together yet, some bloods will be taken at this clinic and you might be referred onto a specialist. They will then phone you at around 6 months after surgery to find out how you are doing and to review your tests. If your bone hasn’t healed you might be offered further surgery at around 1 year following your original operation. This is only required for around 1 in 20 patients.

What Problems Should I Look Out For?

Some problems patients can develop after surgery are infection, blood clots in the leg, poor bone healing, arthritis, knee pain, nerve damage, irritating or prominent metalwork, , knee or ankle stiffness, walking difficulties or poor balance. If you are suffering from any of the list below, it may mean you have one of these problems from your surgery.

  • Infection – You might feel unwell or feverish with increased pain, swelling or stiffness in the knee or ankle. Sometimes the wound can become red, painful or start to leak. If you develop any of these problems contact the clinic using the contact details below. If it is out-with clinic hours and you feel unwell then go to your local Emergency Department.
  • Pain – This can be caused by many problems. If your pain is getting worse or you still have moderate or severe pain more than 12 weeks after surgery and it hasn’t been discussed with your surgeon, then contact the clinic using the details below.
  • Stiffness – If you are having problems with knee or ankle stiffness that is affecting your ability to do things at 12 weeks after surgery you should arrange physiotherapy using the details below.
  • Swelling – If you have new or worse swelling after you have been to your final clinic appointment then contact the clinic using the details below.
  • Breathing problems – For around 1 in 100 patients, a blood clot can form in the veins of the leg after surgery. This might cause pain and swelling in the leg. Very rarely a clot can travel to the lung through the bloodstream. This can give people chest pain or breathing difficulties. If you think you have one of these problems phone an ambulance or NHS24 immediately.

Walking difficulties or balance problems – There are different reasons why patients can have problems with walking or balance after surgery. If these problems continue for more than 12 weeks after surgery you may benefit from speaking to a healthcare professional. You may also have stiffness or pain that affects your ability to walk. If your problem is mainly caused by pain, you should contact the clinic. If it is mainly caused by stiffness, or you have balance problems, you should arrange to see a physiotherapist. It is ok to call the clinic to discuss this first if you are not sure.

Irritating or prominent metalwork – If you can feel a prominent lump around one of your scars, it might be that one of the screws has become loose. If this happens you should contact the fracture clinic.

If you have a problem related to your fracture or surgery that is not listed here but you would like to see someone about it then please contact the clinic using the details below.

Queen Elizabeth University Hospital Fracture Clinic

  • Call: 0141 452 3210 (Monday – Friday, 9.00am – 4.00pm)

Victoria ACH Fracture Clinic

  • Call: 0141 347 8754 (Monday – Friday, 9.00am – 4.00pm)
When Can I Walk Again?

This depends on your injury and the surgery you have. Your surgeon will advise you about this after your surgery. Most patients will be allowed to walk as their pain allows them immediately after surgery.

You will need to wear a walking boot while you are walking for the first 2 weeks after surgery but you can wear it for up to 6 weeks if this is helpful. You can take it off when you are sitting down, sleeping or doing your exercises. Sometimes people need to use crutches for some of this period. This will be assessed by a physiotherapist before you go home and sometimes at their clinics.

When Can I Return To Work?

This depends on the demands of your job. It is likely that you will require 2-3 weeks off to recover from the surgery and allow the discomfort to settle. If you have an office job, returning to work after this for light duties might be possible, but you should avoid anything which makes your ankle uncomfortable, such as prolonged standing or walking.

For manual work requiring lifting, you will need at between 6-12 weeks off, and this may be longer depending of the extent of your injury. If your job involves driving you will be off work for at least 6 weeks. Once you can do the activities required by your job without significant pain, you can go back to work.

When Can I Return to Driving?

You should not drive while you are in a cast or walking boot. You cannot drive for at least 6 weeks after surgery. After this you can drive when you are able to control your vehicle and safely perform an emergency stop. This is your decision. You can discuss this with your doctor or physiotherapist if you are unsure.

You must be safe and in control of the vehicle. The law is very clear that you have to be able to prove to the police that you are ‘safe’ to drive, so it is entirely your own responsibility and we cannot give you permission to drive.

When Can I Return To Sport?

You should only return to contact sport at least 12 weeks after your injury. Other sport may be possible earlier but you should take the advice of your doctor or physiotherapist who will guide you.

Do I Need Physiotherapy?

Before you are discharged you will be seen by a physiotherapist and they will go over the exercises in this book with you. If they feel that you might need extra help they may arrange an appointment at their clinic for you.

If you are having problems with stiffness and this is affecting what you can do discuss this at your clinic appointment and you may need a physiotherapy referral. If you have been discharged from Orthopaedic clinic, please contact the physiotherapy department below or arrange this with your GP.

What Will My Recovery Be Like?

Below is a rough guide of what most patients will be able to do after surgery for a tibial fracture. Everyone is different and some people may take longer or shorter to be able to do these things. If you are unsure please discuss them with your nurse or surgeon.

Weeks 0 to 2

  • You will be in a walking boot for 2 weeks (up to 6 weeks if you find if helpful).
  • Keep foot elevated when you are not walking to reduce swelling.
  • You can weight bear as your pain allows.
  • You can remove this when you are sitting down, in bed or doing your exercises.
  • You can begin the knee and ankle exercises.

Weeks 2 to 6

  • Continue knee and ankle exercises
  • Return to desk based work if required and comfortable.

Weeks 6 to 12

  • The fracture is still healing.
  • You can begin to resume normal activity but be guided by any pain you are experiencing.
  • Carry out day to day activities.
  • Continue knee and ankle exercises.
  • If you no longer require to wear a walking boot you may wish to consider driving provided you can safely operate a car.
  • Heavy tasks, heavy lifting or sport may cause some initial discomfort.

Week 12+

  • The fracture is still healing for most people. It is usually healed by around week 14.
  • Return to manual work, sport and heavy activities may be possible.
  • If you are still experiencing significant pain or swelling that has come on after your week 12 clinic appointment then please contact the fracture clinic for advice.
Exercises

Daily exercise programme

Aim to complete this exercise program every day, five times daily. You should spend around 2 minutes per exercise.

Bed Exercise

1. Straight leg raise

  • Sit in bed with your legs straight and your back supported
  • Point your toes up to the ceiling, tighten your thigh muscles of your operated leg and press the back of your knee down into the bed.
  • Keep the knee straight and lift your leg up off the bed (clearing approx 30cm)
  • Hold for five seconds and then relax for five seconds.
  • Repeat 10 times

2. Ankle Movement

  • Sit in bed with your legs straight and your back supported.
  • Write out the alphabet with your foot, allowing your ankle to move through the movements of all the letters A to Z. All the movements should come from your ankle joint

3. Active assisted toe up with towel

  • Sit in bed with your legs straight and your back supported.
  • Loop a long towel/cloth around the front of your foot.
  • Hold the two ends with your hands.
  • Keeping you knee straight, try to bring your toes up towards your face. Assist the movement by pulling the ends of the towel/cloth.
  • Hold this position for 30 seconds and then release and relax.
  • Repeat 10 times

Chair Exercises

1.Knee bending

  • Sit upright in a chair, with both feet flat on the floor.
  • With the operated leg, slide your foot underneath the chair, keeping your toes on the floor, trying to bend your knee as much as possible, within your pain limits.
  • Hold this bent position for 10 seconds and then slowly return your leg to a comfortable position.
  • Relax between repetitions.
  • Complete this exercise 10 times.

2. Knee extension

  • Sit in a chair, with your knees at 90 degrees, and with both feet on the floor.
  • With the operated leg, tighten the muscles in your thigh, lift your toes and straighten your leg as much as possible.
  • Hold this straight position for five seconds and then slowly lower back down to the floor.
  • Relax between repetitions.
  • Repeat 10 times.
Patient Initiated Return

At the end of your final appointment you will usually be discharged from further follow up. This information sheet has advice on problems to watch out for and advice on exercises you should carry out. You should read through this leaflet closely as they will tell you about what you should expect for your recovery. They will also tell you how to get arrange a further appointment should you have any problems.

Once you have finished at your final appointment, if you develop a problem related to your tibial fracture or surgery, you can contact the clinic and arrange a new appointment yourself. You do not need to contact your GP to do this.

Further Information and Contact Details

Contact Details

  • Queen Elizabeth University Hospital main switchboard – 0141 211 1100
  • Queen Elizabeth University Hospital Fracture Clinic – 0141 452 3210 (Monday – Friday, 9.00am – 4.00pm)
  • Victoria ACH Fracture Clinic – 0141 347 8754 (Monday – Friday, 9.00am – 4.00pm)
  • Appointments booking office – 0141 347 8347 (Monday – Friday, 8.00am – 8.00pm)
  • Physiotherapy – 0141 452 3713 (Monday – Friday 8.30am – 4.00pm)
  • MSK Physiotherapy Self Referral

Other Resources

Was this helpful?

Yes
No
Thanks for your feedback!

This webpage will provide you with some information and exercises for you to follow after your shoulder surgery.

This page is for rehabilitation following surgeries that do not involve immobilisation which means you will not have your arm in a sling for longer than one day. These include:

  • Subacromial decompression
  • Capsular release
  • Acromio-clavicular joint resection

If you have been told after surgery you will be in a sling for a longer than one day then this is not the correct information and you should refer to the Shoulder Surgery: immobilised information.

What Surgery Involves

Your keyhole surgery (arthroscopy) involves the surgeon making small incisions around your shoulder and using a tiny camera to look inside your shoulder joint. They will look for any areas of possible damage and undertake any necessary treatment. Sometimes the treatment required can be more or less than anticipated prior to surgery. 

You will have a general anaesthetic which means you will be asleep. In some cases, we may use a nerve block to numb the area.

After surgery your arm may be in a sling. This is for initial support, as after your procedure there will be little to no movement in the arm and hand. This should not last for longer than 24 hours.  Once you have regained full sensation and movement of your arm it is safe to take the sling off and discard it. You will probably get home on the day of your surgery or on the day after. 

The ward physiotherapist will see you on the ward after your surgery to provide advice and complete exercises with you. They will refer you for further physiotherapy as an outpatient. You will be contacted with an appointment by telephone or letter with your outpatient physiotherapy appointment.

Post Operative Advice

Pain

There will be some pain and discomfort after your surgery. You should take painkillers as prescribed, do not wait for your pain to worsen prior to taking pain relief.

Wound

You will go home from the ward with a dressing over your wound. The nursing staff will give you dressings to use at home and tell you about when and where to get your stitches out. This is usually about ten days after your surgery. However, you will be left with small scars around the shoulder

Sleeping

We advise you to sleep in any comfortable position. However, sleeping on your operated shoulder will probably increase your pain.

Washing and dressing

Avoid getting your wound dressing very wet.

When dressing your upper body place your operated arm into your clothes first for comfort. When undressing remove your operated arm last.

Are there things I should avoid after my surgery?

There are no movements of the shoulder that you need to avoid unless we tell you otherwise. You can expect your arm to be uncomfortable when moving. Do not be frightened to start moving your arm and start the exercises.

We recommend you start light activities when you feel able this should be in the days following surgery. Do not lift anything heavy with your operated arm for at least 6 weeks.

If your arm is painful on certain movements then it is best not to force or push these movements and speak with your physiotherapist.

When can I start to drive again?

You should not drive for 2 weeks after your surgery. Do not drive until you have regained full control and movement of your arm. Before driving sit in your car and try using all of your controls to make sure you are able to do so comfortably. When you return to driving, start with a short journey to ensure you are comfortable and in control.

We also recommend that you speak with your insurance company before you start to drive. The law states you should be in complete control of a car to drive.

When Can I Return to Work?

This depends on your occupation, most people can return to work within 6 weeks of their surgery. If your job involves only small movements of your operated arm you may be able to return to work within 1 week.

Please discuss this with your surgeon, doctor or physiotherapist.

When Can I Return to Hobbies and Sport?

This depends on your pain, shoulder movement and strength. Pain would be a sign that you are not ready to return to a specific activity.

Your physiotherapist will guide your return to heavy activities and sport. We normally recommend that you avoid specific sporting activities that involve the operated arm, such as golf and racquet sports for 3 months.

Physiotherapy

The exercises included below are safe to start once you have the feeling back in your arm, normally the same day or the day after your surgery. It is important that you attempt to do these exercises as instructed to regain the movement and strength of your shoulder.

You will be referred for physiotherapy by the ward physiotherapist – this will usually be within a few weeks of your surgery. You will need to attend physiotherapy to continue your rehabilitation.

Exercises

It is normal to feel aching, discomfort or stretching sensations when doing your exercises. We recommend that you do each exercise 15 – 20 times and repeat this three times per day with at least 2 – 3 hours in between.

  • Pendular: Allow your operated arm to hang by your side and allow it to swing gently forward and backward.
  • Posture: It is important not to slump or have round shoulder posture after your operation. You should practise correct posture regularly.
  • Shoulder Raising: Hold a stick in both hands and slowly raise this upwards, your non-operated arm should help assist movement of your operated arm.
  • Shoulder Side Movements: Hold a stick in both arms at waist level. Gently push your operated arm up and outwards, using your operated arm to assist the movement.
  • Shoulder Rotation: Hold a stick in both hands with your elbows at waist height. Push your operated arm out to the side using your non operated arm to help. You should keep your elbows at your waist, only your hand should move out.
  •  Wall slide: Place your hand flat on wall in front of you at waist or chest height, which ever you are comfortable with. Slide your operated arm up the wall. As your arm raises you may need to step closer to the wall.
  • Table Flexion: place your hands onto flat surface or table. Slowly step backwards keeping your hands on the table bringing your head and shoulders forward into flexion.
Follow Up

All patients will attend follow up appointment but trauma and elective patients will be seen at different clinic types and at different timescales post-operatively.

You will be given your first return appointment by the nursing staff prior to discharge from the ward.

If you have any concerns following surgery please contact your follow up clinic, your GP or physiotherapist for advice.

If you have any urgent concerns please call NHS 24 on 111.

Outpatient Musculoskeletal Physiotherapy input after leaving hospital (hospital discharge)

Your referral will be sent as an urgent request. It is extremely important you attend for Physiotherapy to maximise the benefits of your surgery.

On receiving your referral, you will be contacted by either telephone or letter. If by telephone, this will show as an 0800 number. Please answer this as they do not leave a message.

If RMC (Referral Management Centre) are unable to contact you via telephone, an opt-in letter will be sent to your address. It is important you contact the telephone / email on this letter as soon as you receive it in order to offer you an appropriate appointment.

If after 2 weeks you have not heard anything, please contact RMC on 0800 592 087.

Was this helpful?

Yes
No
Thanks for your feedback!

What is an Ilizarov frame and why is it used?

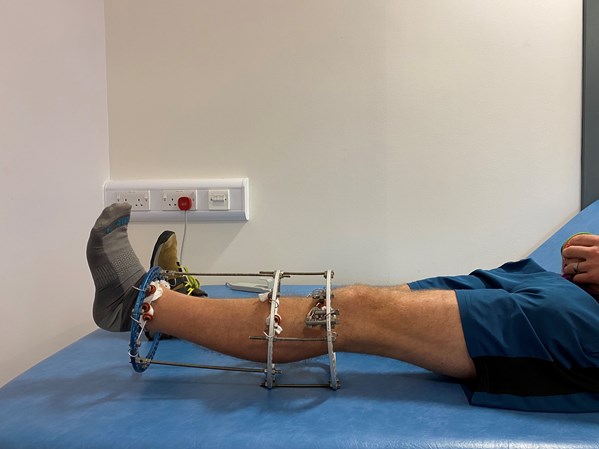
Illzarov is a circular frame used to hold bones in place; this is a type of external fixation. The frame holds broken bones in place to allow healing through the use of rings and wires. The metal rings will go fully or partly round your leg with the metal wires going through your bone and attaching to the rings. The tension between the rings and wires hold the bones to allow healing, this can take some time and your frame can be on for 6 months to 2 years.

Frames are used for:

  • Bone breaks
  • Correcting deformities
  • Leg lengthening
  • Infection of metalwork
  • Non-union of bone internal fixation
Rehabilitation

Rehabilitation is a large part of your recovery once your frame is applied. The physiotherapists and occupational therapists will work with you on the ward from the first day after your surgery until you are fit for discharge home; this will include mobility and other daily tasks such as washing and dressing. It is very important that you work with the physiotherapist and occupational therapists; this is your recovery and your progression relies upon your willingness and co-operation to work with the team looking after you.

If your frame is on the lower half of your leg you will be provided with footwear to fit below the frame and a band will be fitted around the shoe and to your frame to help maintain your ankle movement. See picture below.

Exercises

Once your frame has been applied, you will be expected to learn and perform exercises that will be explained to you by your physiotherapist. It is important to exercise the joints and muscles around the frame to prevent any other problems that would slow your recovery and to promote new bone formation. The main aim of these exercises is to maintain muscle length and strength. Try to repeat these exercises 3 times per day.

Toe exercises

  • Bend and straighten your toes. Repeat 10 times.
  • If you find this is difficult and your toes remain in a bent position try to gently straighten them out with your hands – hold this stretch for 30 seconds and repeat 3-5 times.

Ankle exercises

  • Lying on your back or sitting. Bend and straighten your ankles briskly. If you keep your knees straight during the exercise you will stretch your calf muscles.
  • You can do this against the elastic band that is attached to your frame to make this exercise more difficult.
  • A towel looped around the bottom of your foot can help pull your foot into a stretch – you should feel this up the back of your calf. Hold for 30 seconds and repeat 3-5 times.

Knee exercises

1. Knee bend

  • Either sitting or lying on your back. Bend and straighten your hip and knee by sliding your foot up and down.
  •  Repeat this 10 times.
  • If you are struggling with this then you can use a towel to assist with this as shown.

2. Knee Strength:

  • Lying on your back with legs straight. Bend your ankles up and push your knees down firmly against the bed. Hold 5 seconds then relax. Repeat 10 times. 
  • Inner range Quads: Place a roll underneath your knee. Point your toes to the ceiling, rest the back of the knee against the roll and lift your heel off the bed while straightening your knee. Hold for 3-5 seconds then relax. Repeat 10 times.
  • Straight leg raise: Lying on your back with one leg straight and the other leg bent. Exercise your straight leg by pulling the toes up, straightening the knee and lifting the leg 20 cm off the bed. Hold approx 5 secs. – slowly relax. Repeat 10 times.

Knee Stretch:

In sitting or lying. Rest your ankle on a stool or a rolled up towel. Stay in this position for 5-10 minutes to stretch the back of your knee.

Hip strength:

  • Lying on your front. Squeeze buttocks firmly together. Hold approx. 5 secs. Relax. Repeat 10 times
  •  Sidelying on your non frame side. Keep the leg on the bed bent and the upper leg straight. Lift the upper leg straight up with ankle flexed and the heel leading the movement. Repeat 10 times.
  •  Sidelying on your non frame side. Keep the leg on the bed bent and the upper leg straight. Lift the upper leg up 10cm then keeping the ankle flexed and the heel leading the movement take the leg behind you and back. Repeat 10 times.

Hip Strength in Standing

  • Hip Extension: While standing, hold onto a steady object (e.g. the back of a chair). Keep your trunk still in an upright position and bring your leg backwards. Hold for 3-5 seconds then relax (you can hold for longer as the exercise gets easier). Repeat 10 times.
  • Hip Abduction: While standing, hold onto a steady object (e.g. the back of a chair). Keep your trunk still in an upright position and lift your leg out to the side. Hold for 3-5 seconds then relax (you can hold for longer as the exercise gets easier) Repeat 10 times.
Mobility

After frame application you can fully weight bear on your leg, you will receive pain killers from nursing staff at regular intervals in the day to allow you to participate in your rehabilitation.

Your physiotherapist will provide walking aids to allow you to mobilise from the first day after your operation, the aid used will vary depending how much support you require. It is advisable that you have pain relief prior to therapy input as this will allow you to get the most out of your time with the therapist.

Walking with a frame

  • Place walking frame out in front.
  • Step your frame leg first then weight bear down through your arms and step your non-operated leg in to meet it then repeat.
  • With therapy input you should move to walking one foot past the other, this encourages heel contact and weight bearing on your frame leg which is important.

Walking with elbow crutches

  • You will be progressed to elbow crutches if able
  • Place both elbow crutches out in front
  • Step your frame leg first followed by your non operated leg.
  • When able start to walk one foot past the other again to encourage heel contact and weight bearing on frame leg.
Stairs

If a handrail is available then always use it as well as one crutch. Your physiotherapist will teach you how to carry your other crutch up and down the stairs as you will need it when you get to the top/bottom. 

Going up stairs

Instructions for climbing upstairs are:

  • Place your un-operated leg up onto the step
  • Bring your frame leg up to the same step
  • Bring the crutch up onto the same step

Going down stairs

Instructions for climbing downstairs are:

  • Place your crutch down onto the step below
  • Step down with your frame leg
  • Bring your un-operated leg down to the same step
Transfers

Your Occupational Therapist and Physiotherapist will likely ask you to demonstrate your ‘transfers’, i.e. how you move from one surface to another. This includes getting in/out of your bed, and on/off your toilet and chair. You will need to demonstrate that you can safely do these transfers before going home. Your rehab team will offer you advice on techniques, and may recommend specialist equipment to help. Some general tips for transfers are as follows:

Bed

  • Sit-down high up the bed to minimise the need to adjust your position later.
  • Shifting your weight over each hip in turn can help you shuffle further on/off the bed.
  • Lift your leg high to avoid catching your frame or ripping your sheets/mattress. You may have to change which side you sleep on depending on which leg you find easiest to lead with.
  • The frame can be very heavy, so your Occupational Therapist may provide equipment to make getting in and out of bed easier.

Toilet

  • Your Occupational Therapist will assess your ability to sit down and stand up from the toilet based on information provided about your home
  • Do not sit down until the backs of both knees are touching the toilet.
  • To sit/stand, stick your affected leg out in front, and bending forward at the hips to put your weight through your unaffected leg.
  • To control your movement, your Occupational Therapist may provide you with equipment which gives a sturdy hand-hold, or you can place your hands on the toilet bowl itself for support.      

Chair/sofa

  • It is important to choose a chair that is high enough for you to get off easily. Your occupational therapist may provide equipment to raise your chair heights if required.
  • A chair with armrests on both sides can be useful to push up from.
  • You may wish to elevate your leg for comfort on a stool. Be careful with recliner footrests as your pins may get caught.
Washing and Dressing

Dressing

You will find wearing loose fit trousers, shorts, dresses, skirts or t-shirts ideal for getting on/off over your frame. You may find wearing a bigger size of clothing helps when dressing. When taking clothes on / off over your Ilizarov frame you will be required to be careful of the wires and pin sites You may even wish to cut trousers/ leggings / t-shirt arms above the external fixator. During your hospital stay, your Occupational Therapist will look at you getting dressed to provide further information and equipment to make getting dressed easier if required.

Personal care

You will be advised to try keeping your frame and pin sites dry. It is recommended in between pin site cleans to have a strip wash while sitting on a chair being careful to avoid your pin sites. On the day you are completing pin site clean you can shower beforehand.

Sleeping

When sleeping, you may find it more comfortable sleeping on your back. The metalwork around the frame may cause ripping to your bed sheets, to limit this wrap a pillow case around the External Fixation to protect your bed sheets. Do not place pillows under your frame, this can cause your knee to bend and over time this can limit your ability to fully straighten your knee.

Going home and activity levels

You will be involved in your own discharge planning throughout your rehabilitation including any ongoing needs you may have such as rehabilitation and care package.

Depending on your level of mobility and mobility aid, there are lots of things you will still be able to do for yourself. However, for the more robust activities, it is important to plan, and consider what support you have available to assist you.

Housework

You may still be able to complete basic tasks, for example washing & drying the dishes. In order to make this task easier, consider storing your frequently used dishes and utensils in an easily accessible place at waist height, for example, on the work top, or, an easily reachable cupboard at eye level.

For more robust tasks such as hoovering or changing the bedding, you may want to arrange help. Speak to friends and family about this, or if you are able, privately arrange a cleaner.

Shopping

Your ability to go to the shops will depend on your level of mobility. Being able to attend the shop for groceries should be a goal of yours if you were able to do this before. Initially for convenience, you may wish to speak to friends or family about arranging assistance.

If you have access to the internet, you can also arrange a delivery with a local grocer or supermarket.

Kitchen activity and meal prep

There are many ways you can retain your independence in the kitchen. Your Occupational Therapist will discuss these with you during your assessment.

If there is an able bodied person at home with you, they may be asked to assist you with your meal preparation, and carrying items.

If you live alone, your Occupational Therapist will discuss your kitchen environment, how you will safely transfer items, and may assess you with appropriate equipment depending on your level of mobility at discharge.

Exercises and Mobility

Try not to sit for long periods when at home, go for short walks regularly and keep using your walking aid(s) as instructed by your physiotherapist. Build up your walking distance gradually from short distances around the house to getting out and about.

Continue with your exercises at home 3 times a day.

You will be referred to your local physiotherapy department for ongoing progression of exercises and mobility; they will contact you with appointment once you are at home.

Returning to work

If you are of a working age, and currently in employment, either the Doctor on your ward, or your own GP, can provide you with a sick line as required.

When returning to work, you should speak to your employer’s Occupational Health department. If your employer does not have an Occupational Health department, speak to your GP.

Either your GP or your Occupational Health department can provide advice and guidance with regard to a phased return to work.

Driving

You cannot drive with an ilizarov frame. If you drive you must wait until your frame is removed before returning to driving.

Mental Wellbeing

Having an External frame fitted can require a big adjustment to you (and your families) life. Following the application of your External Fixation you may find you have emotional ‘ups and downs’. Some frame users have described feelings of:

  • Fearfulness
  • Loss of identity
  • Feeling useless
  • Feeling like a burden
  • Fear for the future
  • Concern regarding pain/infection/your own ability

Prior to surgery you may find it beneficial to think of ways of coping and identifying people whom you could speak to when you feel frustrated and low. Your GP, consultant, nurse and AHP staff are also there to support you, providing advice and/or referring you onto other relevant services in your local area. Very often challenges can be overcome by finding ways to adapt to, or overcome, the situation.

You may also benefit from speaking with other frame wearers at the weekly clinic to share experiences and advice. It is important to remember that every frame-wearer will have a different experience, and it is impossible to predict how you will feel, or what challenges you may come across. 

Useful resources

  • Samaritans – 116 123 (freephone)
  • Breathing Space – 0800 83 85 87 (freephone)
Exercise Programme Videos

1. Ankle pumps: Repeat 10 times 3 times per day

2. Ankle strength: start this exercise when exercise 1 becomes too easy.

  • Repeat 10 times 3 times per day

3. Knee stretch: hold position for 10mins repeat every 1-2hours

4. Knee flexion: Repeat 10 times 3 times per day

5. Inner Range Quads: Repeat 10 times 3 times per day

6. Straight Leg Raise: lift and hold for 10seconds.

  • Repeat 10 times 3 times per day

7. Hip Abduction in lying: Repeat 10 times 3 times per day

8. Hip Extension in lying: Repeat 10 times 3 times per day

9. Hip Extension Standing: can be done as alternative to exercise 8.

  • Repeat 10 times 3 times per day

10. Hip Abduction: can be done as alternative to exercise 7.

  • Repeat 10 times 3 times per day

Was this helpful?

Yes
No
Thanks for your feedback!

Advice after having a trapeziectomy

What is Osteoarthritis (OA) of the base of the thumb?

OA of the base of the thumb is a very common complaint. Tis is usually due to normal wear and tear, caused by the demands placed on the thumb during everyday activities.

OA at the base of the thumb can cause symptoms of pain and stiffness. You may find some difficulty with gripping and tasks such as opening jars and turning a key in the lock.

Symptoms can often be controlled by non surgical treatments but if they are not effective surgery may be an option. The most common surgery is called a trapeziectomy. Here, we will give you some advice after having a trapeziectomy.

After the Surgery

The surgery is generally a day procedure which means you can usually go home on the same day as your surgery. Depending on the procedure it may be performed under local anaesthetic in which you will remain awake or under general anaesthetic in which case you will be asleep.

The surgery involves removing a small bone called the trapezium through a small cut at the base of your thumb.

Removal of this bone gives more space for the thumb to move so that the bone surfaces are not rubbing together causing pain.

Sometimes an additional small cut is made on the front of your forearm in order to get a piece of tendon to use to stabilise the base of the thumb after the small bone is removed.

Please note that as with any surgery there are potential risks involved. The majority of people have straight forward recovery following surgery. However complications can occur and include:

  • Infection
  • Nerve damage causing altered sensation or loss of feeling in the thumb area.
  • Persistent scar tenderness.
  • Injury to the arteries of the finger or hand.
  • Failure to resolve the pain.

Please contact the clinic on the numbers provided if you have any concerns

What to Expect After Surgery

Your thumb and hand will be put in a splint or a cast. Your surgeon will advise on when the cast or splint will be removed or changed but this is usually for an overall period of 6 weeks.

If a wire has been inserted, this can be removed after 3 to 4 weeks.

During the time your splint or cast is on, it is important to:

  • Keep your hand raised to help get rid of swelling
  • Move your fingers to prevent them from becoming stiff
  • Do not use your hand for anything other than very light functional activities (eg using telephone, finger typing, turning on a switch)
  • Do not drive

You may experience pain and discomfort at first but normally this resolves with time. Please speak to your GP or pharmacist about controlling your pain if necessary.

Moving and using your hand after your splint or cast has been removed

After the splint or cast has been removed at around 6 weeks after your operation you can now start to exercise your thumb. The exercises are described below. You should try to use your hand as normally as possible but avoid heavy lifting or prolonged tight gripping until around 10 to 12 weeks after the operation. How much you are able to do with your hand at this stage depends on how much pain you are experiencing. it is important to manage your pain to allow you to move your thumb and do your exercises.

Exercises

Exercise 1

Hold all fingers straight. Make big circles with your thumb. Repeat 10 times.

Exercise 2

Place the back of your hand on a table with your thumb and fingers rested. Bring your thumb across to the base of your little finger as far as you are able. Return your thumb back to the starting position. Repeat 10 times.

Exercise 3

  1. Place your elbow or back of your hand on a table. Put the tip of your thumb against each of your fingertips in turn. Repeat 10 times.
  2. Practice picking up small objects.

Exercise 4

Bend the upper joint of your thumb. Assist the movement with your other hand. Hold for 15 seconds. Repeat 10 times.

Driving

You can return to driving when your cast or splint has been removed finally (usually around 6 weeks after your operation) and it is comfortable and safe for you to do so. You must feel that you are in complete control of the car; it is your responsibility to check with your insurance company before returning to driving.

Work

Time Off Work

This will depend on your occupation, place of work, ability to return to light duties and may at times be dependent on whether the operation has been carried out on your dominant hand or not.

Please remember that recovery of full function can take a long time, in some cases it can be 6 months or more before you can carryout any heavy functional tasks.

Was this helpful?

Yes
No
Thanks for your feedback!
What is a Knee Arthroscopy?

A knee arthroscopy is a common orthopaedic operation which involves looking into the knee joint with a fine telescope. It allows the surgeon to see inside the knee and treat several conditions. It is performed under a general anaesthetic, which means that you will be asleep throughout the procedure.

Preparing for Your Appointment

  • Please see your day surgery appointment and guide booklet for further instructions. It is important that you read and follow these instructions fully.
  • Please wear loose fitting trousers, e.g. track suit bottoms as you will have a bulky bandage on your knee after your surgery.
  • Do not shave your knee.
Pain
  • You can expect some discomfort around the wound area. The painkiller tablets given to you before going home should help. We will advise you how to take these. Within the first 24-48 hours, if you have severe pain in your knee not relieved by the painkillers or if your knee becomes very swollen, you should seek advice.
  • Do not take alcohol while taking pain killers.
  • You can help to reduce pain and swelling by raising your leg several times a day and using ice over the knee for 10-15 minutes. (It is important to wrap the ice in a damp towel to protect from ice burn)
Wound Information

Wound Healing

  • The wounds will take approximately 1 week to heal.

Stitches

  • Normally there are no skin stitches.
  • Small sticky tapes have been applied.
  • Please make an appointment with your GP 10 days following your surgery to have your stitches removed (if applicable).

Wound Dressing

  • You may have a padded bandage on top of the dressing. Please remove the padded bandage 24 – 48 hours after your operation.
  • You will have a dressing covering your wound. Remove the dressing after 24- 48 hours. 
  • Some surgeons like you to replace the bandage with a tubigrip to proved knee support.
  • The tubigrip should be worn over the knee from 3 to 4 inches above to 3 to 4 inches below the knee.
  • Continue to wear the tubigrip until the swelling goes down. It should be worn all day but removed at bedtime.

Wound Care

  • Do not shower or bathe for at least 24 hours after your operation.
  • Bathe in plain water only, do not use perfumed products or talcum powder.
  • Make sure you dry your wound gently and thoroughly.
Activity

Once home, rest as much as possible for the remainder of the day.

For the initial few days after surgery the leg should be rested and raised several times a day. It is however vital that you perform your physiotherapy exercises.

You should limit your amount of walking for the first few days and gradually build this up.

Physiotherapy

  • You should not need any walking aids following your surgery; you should get up and try to walk as normally as possible.
  • If you are finding stairs difficult, it may be easier, for the first few days if you take one step at a time, going up with your unoperated leg first and down with your operated leg first.

Return to Work

You can usually return to work after 24 hours but this will depend on your occupation.

Driving

  • Do not drive a vehicle or ride a bicycle for a minimum of 24 hours.
  • Only return to driving when able to comfortably and safely change gear and carry out an emergency stop.
  • Contact your insurance company for further details; all policies vary.
Exercises

 You can start doing these exercise immediately after your surgery although some people prefer to wait until the next day.

Knee Flexion / Extension

Repeat 2 to 3 sets of 10 reps of this exercise. Continue to perform this 2-3 times daily until the movement of your operated leg is equal to the other side.

Passive Knee Extension Stretch

Sitting on a chair, supporting your operated leg on a chair as shown. Let your leg straighten in this position. Remain in this position for 15 minutes to allow the knee to stretch. Slowly bend the knee to take it off the chair. This exercise will assist you to regain full straightening of the knee. Discontinue when you have regained full straightening.
Repeat 1 to 2 times daily.

Static Quadriceps Strengthening

  • Sit with your leg straight. Pull your toes back and push your knee straight by tightening the muscles on the front of your
    thigh.
  • Hold for 5 seconds – relax.
  • Repeat 2-3 sets of 10 reps of this exercise 2-3 times daily.

Quadriceps strengthening

  • Sit with a rolled up towel (or pillow) under the knee. Pulling toes up, press the back of the knee into the roll and lift the heel up by tensing the front of the thigh.
  • Hold for 5 seconds – relax.
  • Repeat 2 to 3 sets of 10 reps of this exercise 2 to 3 times daily.

Straight leg lift (knee strengthening)

  • Sit with your operated leg straight. Exercise your straight leg by pulling the toes up, keeping the knee straight and lifting the leg off the bed.
  • Hold approx. 5 secs – slowly lower.
  • Repeat 2-3 sets of 10 reps of this exercise 2-3 times daily.

Progress onto this exercise when you are able to do it pain free after surgery. This may take up to 6 weeks.

Step up

  • Stand in front of a step. Lead with the operated leg and step fully up onto it.  Use your operated leg to lower yourself back down and start again.
  • Repeat 10-30 times as able, repeat on the other side.
  • Aim to do the same on each side. Do this 2-3 times daily.
Follow up and other information

Follow Up Clinic

  • For most patients there is no need for you to return to the Orthopaedic clinic after your surgery.
  • However, if 6-8 weeks following you operation you have any concerns regarding your knee, see contact details.

Passing Urine

  • It is important that you pass urine as normal after day surgery.
  • Sometimes there may be a delay because you have been fasting. If you have not passed urine before leaving day surgery then you should continue to drink plenty of fluids.
  • After several hours at home if you still do not pass urine, or have an urge but are unable to do so, seek advice.
    See contact details.

First Aid

  • Slight oozing of blood from the wound is not unusual in the first 24 hours.
  • If the wound bleeds heavily, lie down, raise the leg on a pillow and apply pressure with your hand for 10 minutes.

Seek advice immediately, using the contact details, if you develop:

  • Persistent bleeding
  • Severe bruising or swelling
  • A high temperature
  • A hot red wound
  • A foul smell from the wound

GP Letter

You will be given a letter for your GP.

Please hand this into your GP surgery as soon as possible to inform them of your hospital attendance.

Contact Details

In an emergency

In an emergency go immediately to your nearest Accident and Emergency (Take your GP letter, procedure information sheet and any tablets issued by Day Surgery).

If you have any further queries regarding your operation please contact the Day Surgery Unit where you had your operation.

New Victoria ACH (Day Surgery Unit)

  • Call 0141 347 8242 8.30am – 8.00pm Monday to Friday.
  • Out with these hours, if further help or advice is required, contact Ward 3, The New Victoria Hospital (0141 347 8453)
    Contact NHS 24 Telephone No: (111).

Gartnavel General Hospital (Ward 4C)

  • Call 0141 211 3451 8.00am – 7.00pm Monday to Friday
  • Out with these hours, if further help or advice is required, contact NHS 24 by calling 111.

Queen Elizabeth University Hospital (Ward 10A/10B)

Call 0141 452 2700 or 0141 452 2730 8.00am – 7.00pm Monday to Friday• Out with these hours, if further help or advice is required, contact NHS 24 by calling 111.

For most patients there is no need for you to return to the Orthopaedic clinic after your surgery and most patients do not need follow up physiotherapy.  

However, if 6 to 8 weeks following you operation you have any concerns regarding your knee, please contact the  physiotherapy team on 0141 211 3452. This phone is not always attended, we will endeavour to call you back within 2 working days.

Was this helpful?

Yes
No
Thanks for your feedback!

Information regarding therapy following common orthopaedic surgeries.

Surgeries & Conditions

Was this helpful?

Yes
No
Thanks for your feedback!

Was this helpful?

Yes
No
Thanks for your feedback!